
#!/bin/bash

filename=$(date +"%Y-%m-%d")
header="---\n"
header=$header"layout: post\n"
if [[ $1 ]]
then
    header=$header"title: \""$1"\"\n"
    filename=$filename"-"${1// /-}
else
    header=$header"title:\n"
fi
header=$header"date: "$(date +"%Y-%m-%d %H:%M:%S %:z")"\n"
header=$header"categories: \n- CS\n"
header=$header"tags: \n- Computer Science\n"
header=$header"---"
if [[ $1 ]]
then
    echo -e $header > $filename".markdown"
else
    echo -e $header""
fi
分类: 学习笔记
OpenCV从入门到放弃
开篇致谢最为致命,首先感谢大佬的81页计算机视觉指南
最近公司比较闲,本来应该去刷LeetCode的,但是刷自闭了,于是技能树继续向广度发展,正巧前两天看到这个指南了,于是就学着玩玩。
第一步当然是搞一台linux虚拟机,这里我选择了ubuntu Desktop版,然后是安装python,OpenCV库。
sudo apt-get update && sudo apt-get install python3-pip
# 升级
python3 -m pip install --upgrade pip
# 换源
python3 -m pip config set global.index-url https://pypi.tuna.tsinghua.edu.cn/simple
python3 -m pip install opencv-python imutils
然后就是跟着教程练习几个常用函数的使用,以下代码不保证可运行,这里我建议用python交互模式练习,用文件形式有点麻烦
import imutils
import cv2
# 这个图片是Pixiv找的,教程上的图我没找到,有一说一,这图画的很好
# 这张图目前没什么要求,有想要圈起来的东西就行
image=cv2.imread("78172570_p0.jpg")
(h,w,d)=image.shape
print("width={},height={},depth={}".format(w,h,d))

cv2.imshow("Image",image)
cv2.waitKey(0)
(B,G,R)=image[100,50]
print("RGB at 100,50:{},{},{}".format(R,G,B))

roi=image[300:450,450:600]
cv2.imshow("ROI",roi)
cv2.waitKey(0)

resized=cv2.resize(image,(720,720))
cv2.imshow("Fixed Resizing",resized)
cv2.waitKey(0)

r=720.0/w
dim=(720,int(h*r))
resized=cv2.resize(image,dim)
cv2.imshow("Aspect Ratio Resize",resized)
cv2.waitKey(0)
resized=imutils.resize(image,height=720)
(h_l,w_l,d_l)=resized.shape
cv2.imshow("Imutils Resize",resized)
cv2.waitKey(0)

center=(w_l//2,h_l//2)
M=cv2.getRotationMatrix2D(center,-45,1.0)
rotated=cv2.warpAffine(resized,M,(w_l,h_l))
cv2.imshow("OpenCV Rotation",rotated)
cv2.waitKey(0)

rotated=imutils.rotate_bound(resized,45)
cv2.imshow("Imutils Bound Rotation",rotated)
cv2.waitKey(0)
#高斯模糊……
blurred=cv2.GaussianBlur(resized,(11,11),0)
cv2.imshow("Blurred",blurred)
cv2.waitKey(0)

output=image.copy()
#output 左上(x,y),右下(x,y)
#我们最常在新闻上看到的长方形
cv2.rectangle(output,(450,300),(600,450),(0,0,255),2)
cv2.imshow("Rectangle",output)
cv2.waitKey(0)

output=image.copy()
#画圈
cv2.circle(output,(525,375),75,(255,0,0),1)1 for 1px,-1 for solid
cv2.imshow("Circle",output)
cv2.waitKey(0)

output=image.copy()
#划线
cv2.line(output,(725,0),(725,500),(0,0,255),3)
cv2.imshow("Line",output)
cv2.waitKey(0)

output=image.copy()
#写字
cv2.putText(output,"EnderCaster Exercise",(10,25),cv2.FONT_HERSHEY_SIMPLEX,0.7,(255,204,102),2)
cv2.imshow("Text",output)
cv2.waitKey(0)
第一部分的基础练习就完了,然后是抠图图像处理
import cv2
import imutils
import argparse
# 同样是Pixiv找的,这张图的要求是背景单一,角色没有关联
image=cv2.imread("split_test.jpg")
cv2.imshow("Image",image)
cv2.waitKey(0)

# 灰度图
gray=cv2.cvtColor(image,cv2.COLOR_BGR2GRAY)
cv2.imshow("Gray",gray)
cv2.waitKey(0)
# 边缘查找
edge=cv2.Canny(gray,30,150)
cv2.imshow("Edge",edge)
cv2.waitKey(0)

# that not work well
# 阈值,用灰阶图处理效果比较好
thresh=cv2.threshold(gray,242,255,cv2.THRESH_BINARY_INV)[1]
cv2.imshow("Threshold",thresh)
cv2.waitKey(0)

# 看名称像是查找封闭区间,所以上一步没处理好这里可能会多出来一些无效的
cnts=cv2.findContours(thresh.copy(),cv2.RETR_EXTERNAL,cv2.CHAIN_APPROX_SIMPLE)
cnts=imutils.grab_contours(cnts)
output=image.copy()
for c in cnts:
    cv2.drawContours(output,[c],-1,(240,0,159),3)
    cv2.imshow("Contours",output)
    cv2.waitKey(0)
# Rita 人名
text="I found {} Rita!".format(len(cnts))
cv2.putText(output,text,(20,25),cv2.FONT_HERSHEY_SIMPLEX,0.7,(240,0,159),2)
cv2.imshow("Contours",output)
cv2.waitKey(0)
# 去噪
## 腐蚀
## 裁切式...这个去的有点猛
mask=thresh.copy()
mask=cv2.erode(mask,None,iterations=1)
cv2.imshow("Eroded",mask)
cv2.waitKey(0)
## 膨胀
## 扩展式
mask=thresh.copy()
mask=cv2.dilate(mask,None,iterations=3)
cv2.imshow("Dilated",mask)
cv2.waitKey(0)
# 按位与,慎用,效果比较令人迷惑
mask=thresh.copy()
output=cv2.bitwise_and(image,image,mask=mask)
cv2.imshow("Output",output)
cv2.waitKey(0)
Tmux使用手记
# 更改默认socket路径
export TMUX_TMPDIR=~
echo 'export TMUX_TMPDIR='${TMUX_TMPDIR}'/tmux' >> ~/.bashrc
source ~/.bashrc
tmux -S ~/tmux/tmux-1000/default
# 自动化保存恢复session
mkdir -p ~/.tmux/plugins && cd ~/.tmux/plugins
git clone https://github.com/tmux-plugins/tmux-resurrect.git
git clone https://github.com/tmux-plugins/tmux-continuum.git
# .tmux.conf
run-shell ~/.tmux/plugins/tmux-resurrect/resurrect.tmux
set -g @continuum-save-interval 5
set -g @continuum-restore 'on'
set -g status-right 'Continuum status: #{continuum_status}'
run-shell ~/.tmux/plugins/tmux-continuum/continuum.tmux
有关于求余数
昨天在久违的leetcode上做题(是个菜鸟,还在简单阶段卡着),在7-整数反转这一题的题解中看到了有关于不同语言求余数的不同结果
在python中 :-53除以10=-6 …7 所以python中 -53%10=7
在c语言中,-53除以10=-5 … -3 所以c语言中 -53%10=-3
aabathur@LeetCode
跟朋友讨论了一下这个问题,最后的结论是:python的计算方式是符合定义的
C语言这种方式是向零取整,而根据定义
余数-百度百科
取余数运算:
a mod b = c 表示 整数a除以整数b所得余数为c。
余数的计算公式:c = a -⌊ a/b⌋ * b
其中,⌊ ⌋为向下取整运算符,向下取整运算称为Floor,用数学符号⌊ ⌋表示
可以看出,商应为向下取整,例如 ⌊ -4.2⌋=-5,即-53 mod 10=-6…7
有道智云文本翻译
最近需要用到在线翻译,就找了一个初期免费(送100初始资金)的站,而且有道这个网站主要就是做翻译的,质量应该还是信得过
请求示例:
import random, string, config

def randomword(length):
    letters = string.ascii_lowercase
    return ''.join(random.choice(letters) for i in range(length))

appSecret=config.appSecret

q="<待翻译文本>"
from="en"
to="zh-CHS"
appKey=config.appKey
salt=randomword(<任意长度>)
sign=md5(appKey+q+salt+appSecret) #格式要求:%32X
返回示例
{
    "tSpeakUrl": "",
    "web": [
        {
            "value": [
                "lunar eclipse",
                "Eclipse",
                "moon's eclipse"
            ],
            "key": "月食"
        },
        {
            "value": [
                "penumbral lunar eclipse",
                "penumbral eclipse",
                "appulse"
            ],
            "key": "半影月食"
        },
        {
            "value": [
                "moon phases"
            ],
            "key": "月食字体"
        }
    ],
    "query": "月食",
    "translation": [
        "Eclipse of the moon"
    ],
    "errorCode": "0",
    "dict": {
        "url": "yddict://m.youdao.com/dict?le=eng&q=%E6%9C%88%E9%A3%9F"
    },
    "webdict": {
        "url": "http://m.youdao.com/dict?le=eng&q=%E6%9C%88%E9%A3%9F"
    },
    "basic": {
        "phonetic": "yuè shí",
        "explains": [
            "[天] eclipse of the moon",
            "[天] lunar eclipse"
        ]
    },
    "l": "zh-CHS2en",
    "speakUrl": ""
}
解除WordPress上传文件格式限制
@/wp-config.php
添加
define("ALLOW_UNFILTERED_UPLOADS",true);
有时可能会不好用,关闭supercache试试
docker wordpress 文件2M上传限制问题
修改 .htaccess文件
我的挂载目录是/opt/wordpress/html , .htaccess文件就在这个目录下
在最后加入
php_value post_max_size 24M
php_value upload_max_filesize 8M
[北京大学计算机考研复试题解]skew binary
原题
在skew binary 表示中,数x的第k位的值x[k]表示x[k]*(2^(k+1)-1).每个位上的可能数字是0或1,最后面一个非零位可以使2,例如10120(skew)=1*(2^(4+1)-1)+0*(2^(3+1)-1)+1*(2^(2+1)-1)+2*(2^(1+1)-1)+0*(2^(0+1)-1).前十个skew数为0、1、2、10、11、12、20、100、101以及102.
要求:
输入包含一行或多行,每行包含一个整数n,若n=0,则输入结束,否则其为skew数,输出对应的十进制值
using namespace std;
file f;
while (char line[]=f.readline()){}
int result=0;
int bitCounter=0;
while(line>0){
    unsigned short bit=line%10;
    line/=10;
    result=bit*(2(bitCounter+1)
    bitCounter++;
}
变体
在skew binary 表示中,数x的第k位的值x[k]表示x[k]*(2^(k+1)-1).每个位上的可能数字是0或1,最后面一个非零位可以使2,例如10120(skew)=1*(2^(4+1)-1)+0*(2^(3+1)-1)+1*(2^(2+1)-1)+2*(2^(1+1)-1)+0*(2^(0+1)-1).前十个skew数为0、1、2、10、11、12、20、100、101以及102.
要求:
输入包含一行或多行,每行包含一个十进制整数n,若n=0,则输入结束,否则输出对应的skew表示
[cc lang=’C++’]
System.out.println(“Hello Github Pages”);
// prints ‘Github Pages’ to STDOUT.
[/cc]
Chrome清除特定站点缓存
F12 打开开发者选项,点击网络选项卡,选取disable cache,则清除单站缓存
dot语言学习笔记
Dot是开源工具包Graphviz上用来画图的一门脚本语言。通过布局引擎解析脚本得到图像,然后可以将图像导出为各种格式以满足需求,有了它,我们就可以很方便地通过编写脚本来画各种结构示意图和流程图。
常用关键字:
graph:定义当前图属性
node:定义各结点属性,如fontname
subgraph:定义子图,需要以cluster开头,否则引擎不识别
例:
digraph service_map {
    graph [dpi="300"];
    node [color="gray";shape="record";fontname="Microsoft YaHei"];

    label="Service Map";
    Request;
    github_pages [label="GitHub Pages"];
    subgraph cluster_web{
        label="Web front end server";
        nginx [label="Reverse Proxy Server"];
        docker [label="Docker Container Manager"];
    }
    subgraph cluster_docker{
        label="Docker Container Manager";
        openproject [label="OpenProject"];
        gitlab [label="GitLab"];
        wordpress [label="WordPress"];
        mysql [label="Common Mysql Database"];
    }
    subgraph cluster_filesystem{
        label="Mount at where";
        openproject_mnt [label="/opt/openproject/data:/var/lib/postgresql/9.6/main\l\n/opt/openproject/logs:/var/log/supervisor\l\n/opt/openproject/static:/var/db/openproject\l"];
        gitlab_mnt [label="/opt/gitlab/config:/etc/gitlab\l\n/opt/gitlab/logs:/var/log/gitlab\l\n/opt/gitlab/data:/var/opt/gitlab\l"];
        wordpress_mnt [label="/opt/wordpress/www:/var/www/html"];
        mysql_mnt [label="/opt/mysql/data:/var/lib/mysql"];
    }
    Request->nginx;
    nginx->docker;
    nginx->github_pages;
    docker->wordpress [label="hostname=wordpress.endercaster.com"];
    docker->openproject [label="hostname=openproject.endercaster.com"];
    docker->gitlab [label="hostname=gitlab.endercaster.com"];
    wordpress->mysql;
    wordpress->wordpress_mnt [label="mount"];
    openproject->openproject_mnt [label="mount"];
    gitlab->gitlab_mnt [label="mount"];
    mysql->mysql_mnt [label="mount"];
}
这段代码生成的图像如下
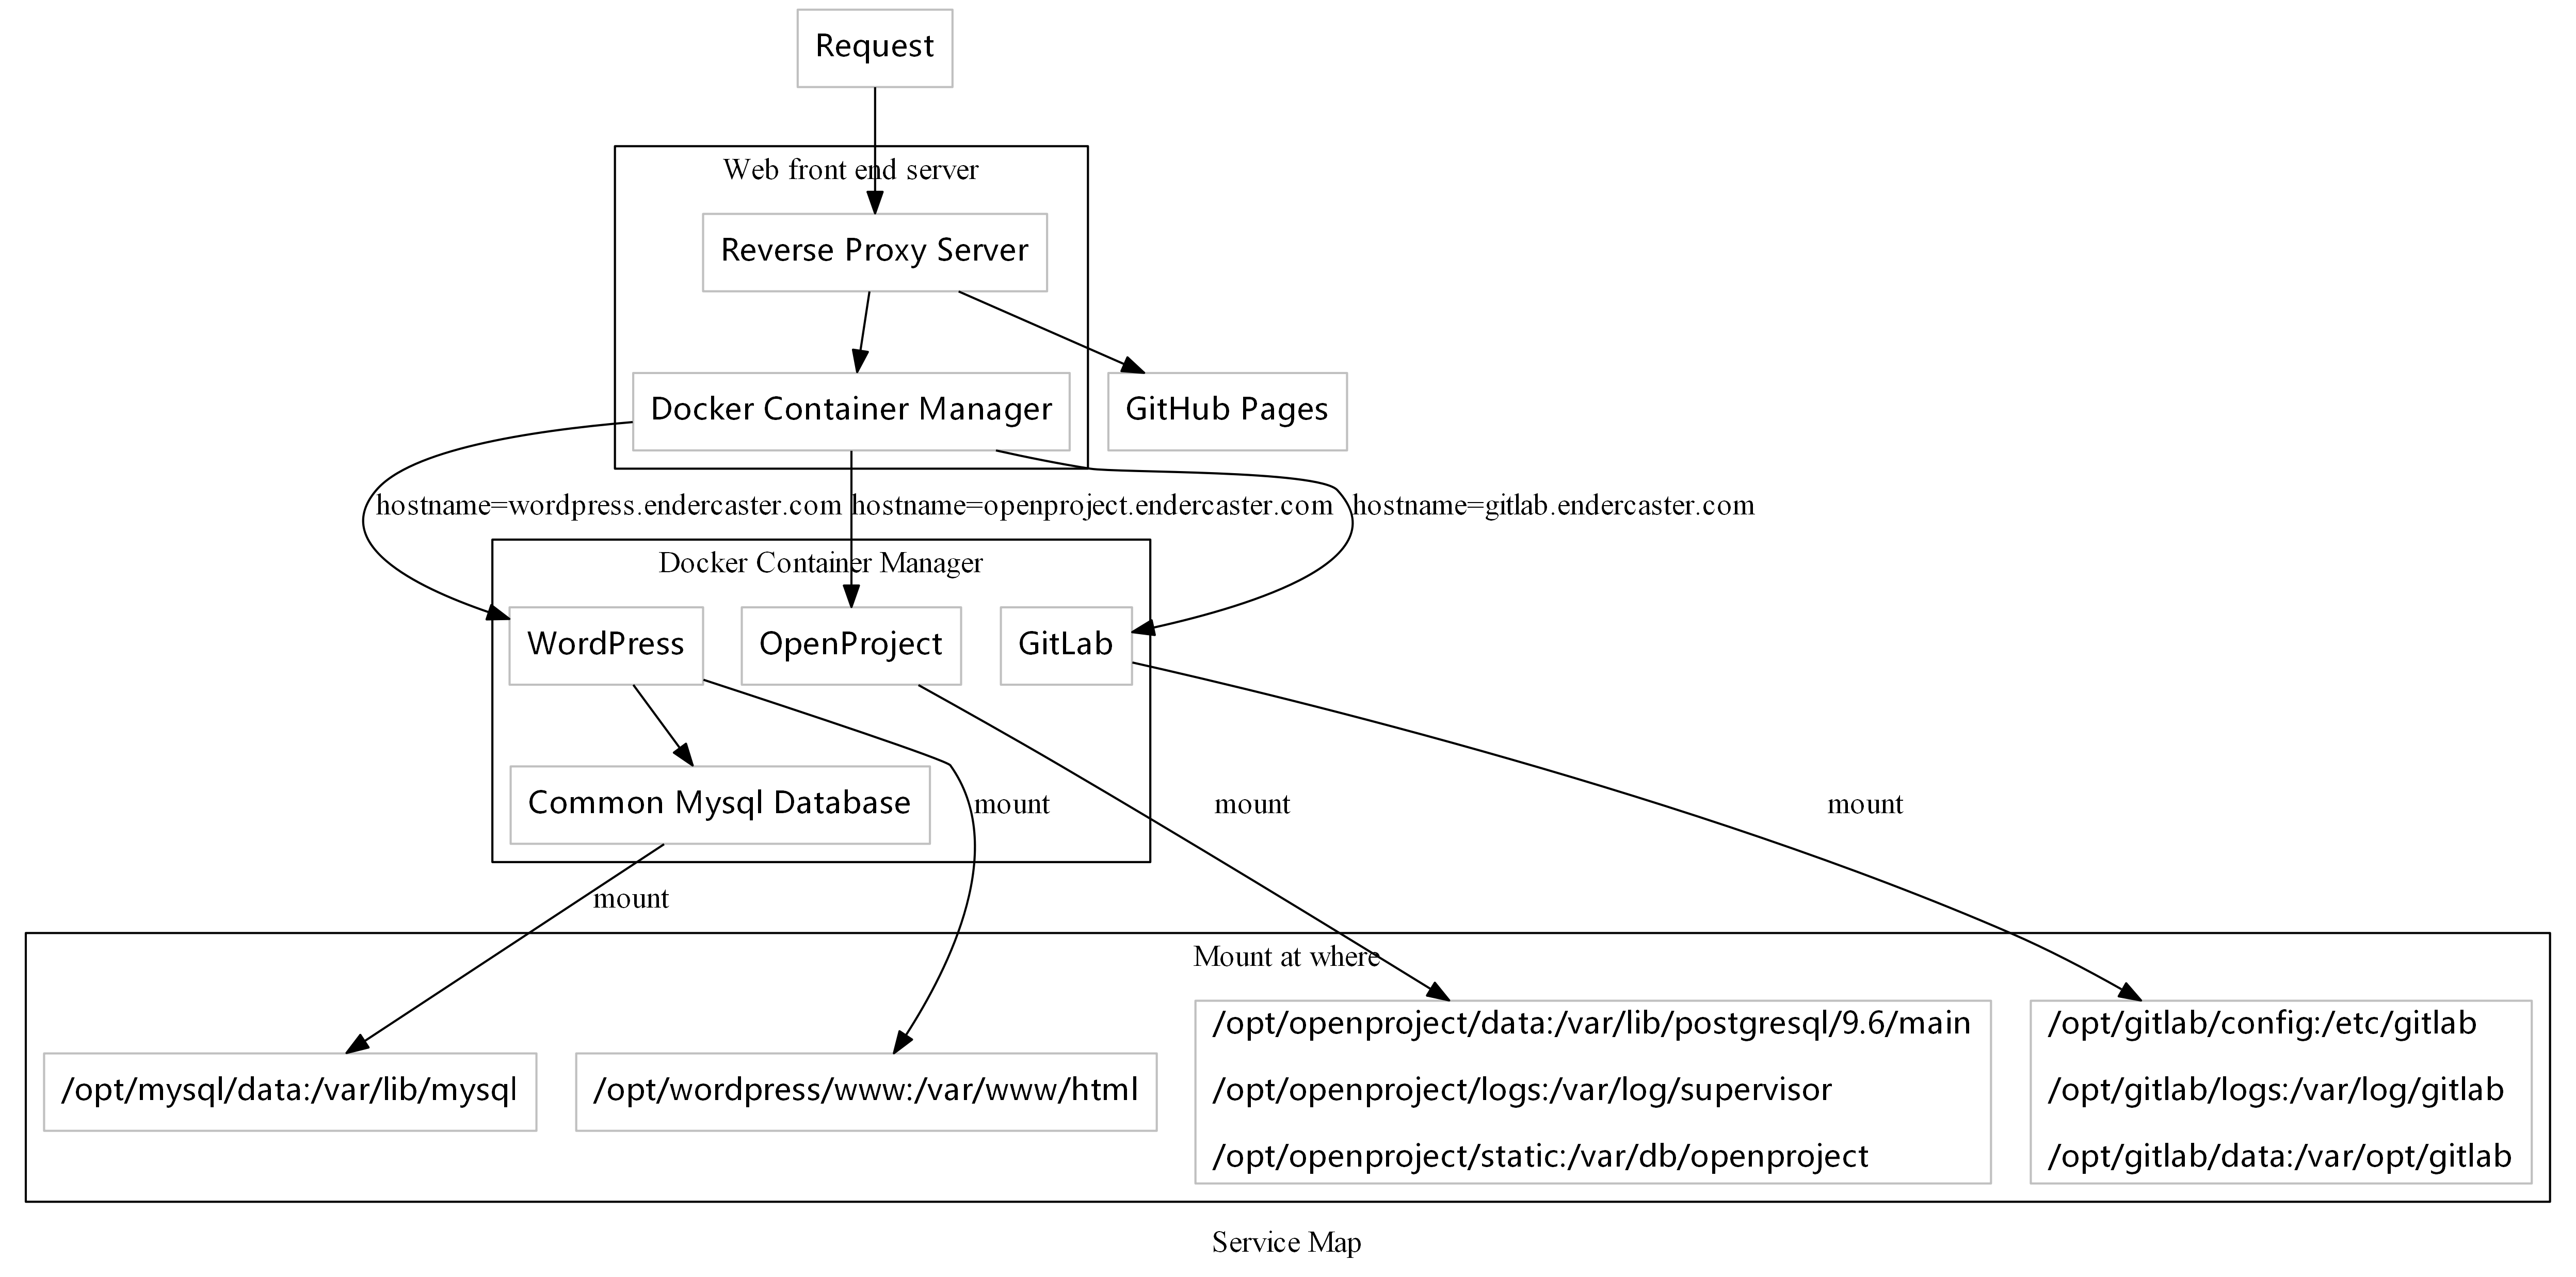
相对于图形化的visio,使用dot画图省去了排版,只需要关心软件中都有什么模块,实现什么功能,可以说是非常省心了。